| 일 | 월 | 화 | 수 | 목 | 금 | 토 |
|---|---|---|---|---|---|---|
| 1 | 2 | 3 | ||||
| 4 | 5 | 6 | 7 | 8 | 9 | 10 |
| 11 | 12 | 13 | 14 | 15 | 16 | 17 |
| 18 | 19 | 20 | 21 | 22 | 23 | 24 |
| 25 | 26 | 27 | 28 | 29 | 30 | 31 |
- terraform
- kubernetes 동작 원리
- 그라파나 시각화
- 쿠버네티스 컴포넌트
- Solution Architecture
- 딥레이서 보상함수
- livenessPorbe
- AWS 딥레이서
- github action 사용법
- 로드밸런서 컨트롤러
- Firelens
- LoadBalancer Controller
- SAA 합격 후기
- 깃허브 액션
- EKS 클러스터
- 쿠버네티스
- Kubernets on Jenkins
- 솔데스크
- 메탈LB
- EFS CSI Driver
- 그라파나 대시보드
- Kubernetes
- grafana on kubernetes
- blue-green
- 딥레이서
- Prometheus install
- jenkins
- helm
- headless service
- Aurora cluster
mingming
ELK on Kubernetes - ElasticSearch 본문
ELK on Kubernetes
이번 포스팅에선 쿠버네티스 위에 ELK 스택을 배포해보려 합니다. helm 차트를 이용해 간편하게 배포가 가능해 어렵지않게 구축할 수 있습니다.
사전 준비사항 & 설치 환경
helm : helm 차트를 이용해 배포할 것이기 때문에 사전에 설치되어 있어야 합니다.
nfs-provisoner : elasticsearch가 사용할 PV를 동적으로 생성하기 위해 필요합니다.
OS : Ubuntu 20.04
RAM : 4GB
master node : 1대
worker node : 1대
ElasticSearch
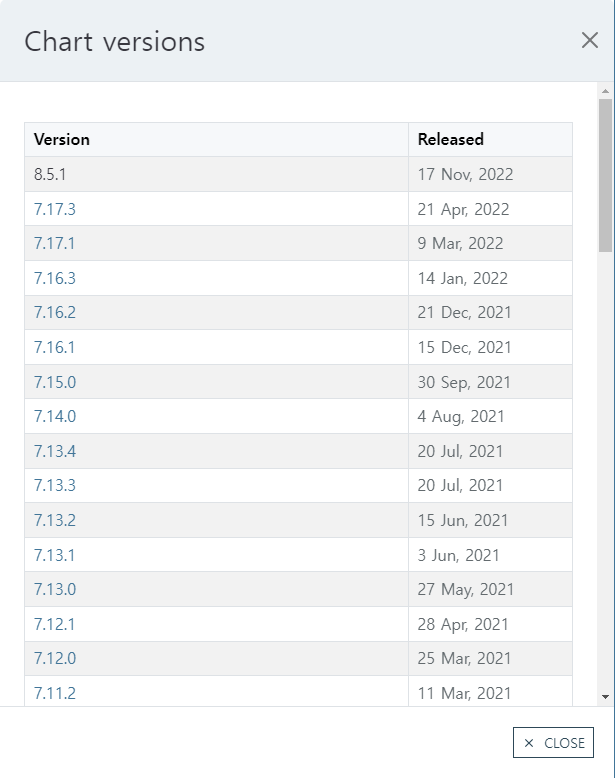
elastic에서 제공하는 helm 차트를 이용해 설치를 진행했습니다. 설치가능한 버전은 다음과 같습니다. 상황에 맞는 버전을 선택해 간편하게 설치할 수 있습니다. 지난포스팅에선 7.x 버전을 설치했기에 이번엔 8.5.1 버전으로 설치를 진행해보려 합니다.

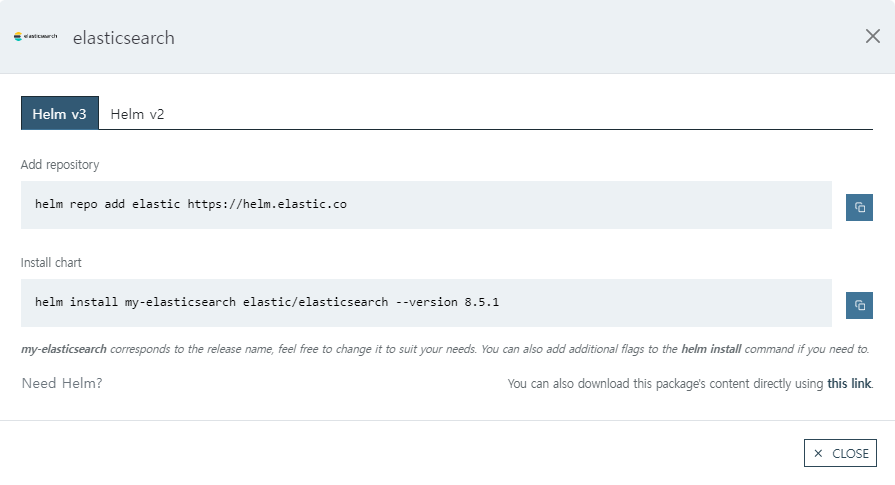
위의 링크의 ArtifactHUB로 들어가 INSTALL 버튼을 누르면 헬름차트 레포지터리 추가 및 설치 명령어가 제공됩니다.

helm repo add
helm repository 추가 후 update를 진행해 줍니다.
helm repo add elastic https://helm.elastic.co

helm repo update
helm repo list 명령어를 통해 현재 시스템에있는 help repository 목록을 확인할 수 있습니다.
helm repo list
root@master:~# helm repo list
NAME    URL
metallb https://metallb.github.io/metallb
bitnami https://charts.bitnami.com/bitnami
jenkins https://charts.jenkins.io/
argo    https://argoproj.github.io/argo-helm
elastic https://helm.elastic.co
패키지를 설치하기 전 해당 레포지터리에 어떤 패키지들이 있는지 확인 해보겠습니다.
helm search repo elastic

root@master:~# helm search repo elastic
NAME                            CHART VERSION   APP VERSION     DESCRIPTION
bitnami/elasticsearch           19.13.11        8.11.1          Elasticsearch is a distributed search and analy...
elastic/eck-elasticsearch       0.8.0                           Elasticsearch managed by the ECK operator
elastic/elasticsearch           8.5.1           8.5.1           Official Elastic helm chart for Elasticsearch
elastic/apm-attacher            0.1.0                           A Helm chart installing the Elastic APM mutatin...
elastic/apm-server              8.5.1           8.5.1           Official Elastic helm chart for Elastic APM Server
elastic/eck-agent               0.8.0                           Elastic Agent managed by the ECK operator
elastic/eck-beats               0.8.0                           Elastic Beats managed by the ECK operator
elastic/eck-fleet-server        0.8.0                           Elastic Fleet Server as an Agent managed by the...
elastic/eck-kibana              0.8.0                           Kibana managed by the ECK operator
elastic/eck-logstash            0.8.0                           Logstash managed by the ECK operator
elastic/eck-operator            2.10.0          2.10.0          Elastic Cloud on Kubernetes (ECK) operator
elastic/eck-operator-crds       2.10.0          2.10.0          ECK operator Custom Resource Definitions
elastic/eck-stack               0.8.0                           Elastic Stack managed by the ECK Operator
elastic/filebeat                8.5.1           8.5.1           Official Elastic helm chart for Filebeat
elastic/kibana                  8.5.1           8.5.1           Official Elastic helm chart for Kibana
elastic/logstash                8.5.1           8.5.1           Official Elastic helm chart for Logstash
elastic/metricbeat              8.5.1           8.5.1           Official Elastic helm chart for Metricbeat
elastic/pf-host-agent           8.11.1          8.11.1          Hyperscaler software efficiency. For everybody.
bitnami/dataplatform-bp2        12.0.5          1.0.1           DEPRECATED This Helm chart can be used for the ...
bitnami/kibana                  10.6.2          8.11.1          Kibana is an open source, browser based analyti...
해당 레포를 확인해보니 이번 실습에 필요한 elasticsearch, logstash, filebeat, kibana가 모두 포함되어 있는것을 확인할 수 있습니다. 순서대로 설치해보도록 하겠습니다.
ElasticSearch 설치
1. 먼저 설치에 필요한 설정값을 갖고있는 values 파일을 가져옵니다.
helm show values elastic/elasticsearch > elasticsearch-values.yaml
2. values 파일 수정
현재 제 쿠버네티스 클러스터에는 워커노드가 한개 존재하기 때문에 replicas 개수를 조정해줍니다. elasticsearch는 statefulset 으로 정의되어 있습니다. 또한 상당히 많은 메모리를 차지하기 때문에 개수를 조절해야 합니다.
vi elasticsearch-values.yaml

### replicas 수정
 24 replicas: 1
 25 minimumMasterNodes: 1
elasticsearch의 인증을 위한 패스워드를 설정할 수 있습니다.
 59 secret:
 60   enabled: true
 61   password: "" # generated randomly if not defined
elasticsearch에서 사용할 PV를 동적으로 생성하기 위해 다음과 같이 storageclass를 지정해줍니다.
108 volumeClaimTemplate:
109   accessModes: ["ReadWriteOnce"]
110   storageClassName: nfs-client
111   resources:
112     requests:
113       storage: 30Gi
3. elastic search 설치
사전에 설정해둔 values 파일의 설정값으로 elasticsesarch를 설치합니다. 설치가 완료되면 아래와 같은 문구가 나오는데 파드와 위에서 설정해둔 password의 값을 확인할 수 있는 명령어를 제공해 줍니다.
helm install elasticsearch elastic/elasticsearch -f elasticsearch-values.yaml

root@master:~# helm install elasticsearch elastic/elasticsearch -f elasticsearch-values.yaml
NAME: elasticsearch
LAST DEPLOYED: Wed Dec  6 03:15:54 2023
NAMESPACE: default
STATUS: deployed
REVISION: 1
NOTES:
1. Watch all cluster members come up.
  $ kubectl get pods --namespace=default -l app=elasticsearch-master -w
2. Retrieve elastic user's password.
  $ kubectl get secrets --namespace=default elasticsearch-master-credentials -ojsonpath='{.data.password}' | base64 -d
3. Test cluster health using Helm test.
  $ helm --namespace=default test elasticsearch
4. elasticsearch 접속 테스트
helm 차트를 통해 배포하게되면 다음과 같은 두개의 secret 오브젝트가 생성됩니다.
elasticsearch-master-certs : ssl/tls 암호화를 위한 인증서 정보를 저장하고 있는 secret 오브젝트 입니다. 과거 elasticsearch 7 버전에선 http로 통신이 가능했으나 최신버전에선 https 통신을 권장하며 기본적으로 ssl 인증서가 생성되는 것 같습니다.
elasticsearch-master-credentials : elasticsearch에대한 인증정보를 저장하고 있는 secret 오브젝트입니다. password와 username 정보를 담고 있습니다.
kubectl get secret

elasticsearch-master-certs            kubernetes.io/tls    3      114s
elasticsearch-master-credentials      Opaque               2      114s
Secret 오브젝트는 base64로 인코딩 된 값을 저장하고있기 때문에 다음 명령어를 통해 디코딩하여 로그인 정보를 확인할 수 있습니다.
kubectl get secret elasticsearch-master-credentials -o jsonpath='{.data.username}' | base64 -d

kubectl get secret elasticsearch-master-credentials -o jsonpath='{.data.password}' | base64 -d
앞서 언급한 것 처럼 ssl/tls 암호화가 되어 있기 때문에 https 접속하기위해 공개키가 필요합니다 접속에 필요한 공개키를 elasticsearch-master-certs에서 가져올 수 있습니다. 다음 명령어를 통해 공개키를 ca.crt 라는 이름으로 저장할 수 있습니다.
kubectl get secret elasticsearch-master-certs -o jsonpath='{.data.ca\.crt}' | base64 -d > ca.crt
해당 공개키로 elasticsearch 9200번 포트로 접근해보도록 하겠습니다. curl 명령어의 --cacert 옵션을 통해 사용할 키를 지정할 수 있습니다.
curl https://10.44.0.6:9200 --cacert ca.crt

curl: (60) SSL: no alternative certificate subject name matches target host name '10.44.0.6'
More details here: https://curl.haxx.se/docs/sslcerts.html

curl failed to verify the legitimacy of the server and therefore could not
establish a secure connection to it. To learn more about this situation and
how to fix it, please visit the web page mentioned above.
위의 명령어를 수행하면 등록되지 않은 호스트 네임이라는 에러가 발생합니다. 이는 Subject Alternative Name에 등록되어 있지 않아서 발생하는 에러입니다.
tls.crt 파일을 가져와 해당 내용을 살펴보면 다음과같은 내용을 확인할 수 있습니다. DNS 네임을 살펴보면 이름 형식이 CoreDNS 형식으로 되어있습니다. 즉 파드간에 통신할 때는 해당 인증서를 통해 접근할 수 있음을 알 수 있습니다.
kubectl get secret elasticsearch-master-certs -o jsonpath='{.data.tls\.crt}' | base64 -d > tls.crt

openssl x509 -in tls.crt --text

 X509v3 Subject Alternative Name:
                DNS:elasticsearch-master, DNS:elasticsearch-master.default, DNS:elasticsearch-master.default.svc
접속 테스트를 위해 -k 옵션을 사용해 이러한 인증서의 유효성 검사를 무시할수 있습니다. -k 옵션을 사용했음에도 다음과 같은 에러가 발생했습니다. 이는 elasticsearch의 인증정보를 입력하지 않아서 생긴 에러입니다. 즉 위에서 확인했던 username과 password를 통해 접근해야 한다는 의미입니다.
root@master:~# curl https://10.44.0.6:9200 --cacert ca.crt -k
{"error":{"root_cause":[{"type":"security_exception","reason":"missing authentication cred
entials for REST request [/]","header":{"WWW-Authenticate":["Basic realm=\"security\" char
set=\"UTF-8\"","Bearer realm=\"security\"","ApiKey"]}}],"type":"security_exception","reaso
n":"missing authentication credentials for REST request [/]","header":{"WWW-Authenticate":
["Basic realm=\"security\" charset=\"UTF-8\"","Bearer realm=\"security\"","ApiKey"]}},"sta
-u 옵션을 사용해 접속할 사용자를 지정할 수 있습니다. 해당 명령어 실행 후 password를 입력하면 다음과 같이 정상적으로 접근이 가능한 것을 확인하실 수 있습니다.
curl https://10.44.0.6:9200 --cacert ca.crt -k -u elastic

root@master:~# curl https://10.44.0.6:9200 --cacert ca.crt -k -u elastic
Enter host password for user 'elastic':
{
  "name" : "elasticsearch-master-0",
  "cluster_name" : "elasticsearch",
  "cluster_uuid" : "uAEPMB30TbSo9ALpgV5Dhw",
  "version" : {
    "number" : "8.5.1",
    "build_flavor" : "default",
    "build_type" : "docker",
    "build_hash" : "c1310c45fc534583afe2c1c03046491efba2bba2",
    "build_date" : "2022-11-09T21:02:20.169855900Z",
    "build_snapshot" : false,
    "lucene_version" : "9.4.1",
    "minimum_wire_compatibility_version" : "7.17.0",
    "minimum_index_compatibility_version" : "7.0.0"
  },
  "tagline" : "You Know, for Search"
}
'ELK' 카테고리의 다른 글
| ELK on Kubernetes - Kibana (0) | 2023.12.07 |
|---|---|
| ELK on Kubernetes - Logstash (4) | 2023.12.07 |
| Kibana 설치 및 기본설정 및 ElasticSearch 연동 (4) | 2023.12.05 |
| Logstash - beats를 통한 로그 입력 및 로그 파싱 (0) | 2023.11.25 |
| Logstash 설치 및 기본설정 (0) | 2023.11.25 |


